Brew: 17 March 2019
Secondary: 22 March 2019
Bottle: 29 March 2019
Refrigerate: 13 April 2019
Drink: 20 April 2019
March 17th, 2019 marked my 30th birthday. To celebrate, I started on the 100 Brew Challenge. I am attempting to brew one hundred times before I turn forty. The hope is to try out many different methods, styles, and generally get better at brewing. For my first brew, I decided to take on something entirely new. It was something I had been wanting to do for some time. A Vanilla Cream Ale.
I use brewersfriend.com to house my recipes and look up other recipes. I found a well reviewed vanilla cream ale on the site and made some alterations to make it more my style. You will see that I am shooting for a higher ABV. In my last brew, I fell below what I expected. I am shooting high in case I make the same mistake. Although, I think the mistake was temperature control on the fermentation since it was the middle of February. Since I will be fermenting inside, I shouldn’t have to worry about that.
The Recipe
Brew Method: All Grain
Style Name: Cream Ale
Boil Time: 75 min
Batch Size: 4.5 gallons (fermentor volume)
Boil Size: 6 gallons
STATS:
ABV (standard): 7%
IBU (tinseth): 21.3
SRM (morey): 5.76
FERMENTABLES:
5 lb – American – Pale 2-Row (43.5%)
2 lb – American – White Wheat (17.4%)
2 lb – American – Pale 6-Row (17.4%)
0.5 lb – American – Caramel / Crystal 20L (4.3%)
0.5 lb – American – Carapils (Dextrine Malt) (4.3%)
0.75 lb – Flaked Barley (6.5%)
0.75 lb – Honey – (late addition) (6.5%)
HOPS:
0.5 oz – Cascade, Type: Pellet, AA: 6.2, Use: Boil for 60 min, IBU: 12.51
0.5 oz – Cascade, Type: Pellet, AA: 6.2, Use: Boil for 20 min, IBU: 7.58
0.5 oz – saaz, Type: Pellet, AA: 3, Use: Boil for 5 min, IBU: 1.21
OTHER INGREDIENTS:
1 – whirlfloc, Time: 15 min, Type: Fining, Use: Boil
2 oz – pure vanilla extract, Time: 0 min, Type: Flavor, Use: Boil
4 each – Vanilla beans – in 2oz Vodka, Time: 0 min, Type: Other, Use: Secondary
1 oz – pure vanilla extract, Time: 0 min, Type: Flavor, Use: Bottling
YEAST:
Wyeast – Kölsch 2565
Optimum Temp: 56 – 70 F
Fermentation Temp: 64 F

My brewing day started off with a few setbacks. First, my hope to start in the morning was dashed. I can’t complain. I had a party at my house the night before and it didn’t break up until after midnight. Mix that with waking up with my newborn son a couple times, and I didn’t get started until the early afternoon. As I got started, I found that my kettle had a few grain burn spots on the bottom of it from February’s brew. So I spent a good half hour scrapping those off. Then, as I finally thought I was ready, I couldn’t find my thermometer. But after searching for 15 minutes, I decided to stop caring. So, this will be my first brew without knowing the exact temperature as I brew.
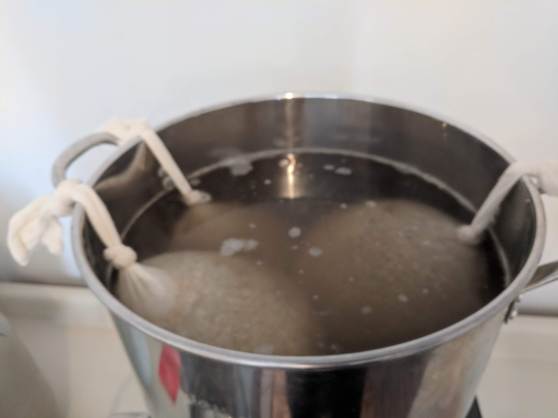
Luckily my brewery is in the same room as our water heater. I’ve tested the temperature of the water as it comes directly out of the water heater. 160 degrees Fahrenheit. Perfect for the mash. So I took the water from there and kept the burner at a level that should maintain. I tend to leave the grain in the mash for about an hour before getting started on the boil. That seems to be more than enough time to get all the necessary sugars into the mash. On a side note, these grain socks are amazing. The last few brews that I have done I just made an oatmeal and strained it. This is so much better. So much better.

As I wait for my mash to finish up, I set up my private corner. As my wife, her best friend, and my son are out shopping, I get to enjoy a show, a video game, a beer, and some chili. I honestly don’t think I could ask for much of a better way to celebrate my birthday.


The finished mash had significantly less volume than I had hoped for. No matter. With the grain socks, it’s easy to recover more mash without sacrificing ABV or quality. Using the hot water directly from the hot water heater, I took the grain socks in a separate container and soaked them with the extra water. This brought me from about 4 gallons to about 5.5. I like starting my boils at about 5.5 so that I can have about five gallons to actually ferment with.

Before (top) and after (bottom)
I did a 75 minute boil on this brew, as the recipe called for. At the end of the boil, I added two ounces of pure vanilla extract–which is where most of the vanilla flavor will be coming from. When I finished, I ended up being rather short on time before we were heading off for some Saint Patrick Day Drinking. This ended up being a blessing. Since I don’t have any cooling device, I had to improvise. And I came up with a fantastic plan. I placed the wort in the carboy. I placed the carboy in a backup kettle. Then I brought them outside and placed a hose in the kettle. It’s March, so it poured cold water into the kettle. It only held about a gallon of water with the carboy in it. So I filled it with cold water, waiting for that water to heat up, put more cold water in, and repeat. In the end, I got the temperature down within an hour.

Once I was at about seventy degrees, I pitched the wort. This was my first time using liquid yeast. I ended up failing to read the instructions before opening the package. So…something to work on for next time. Regardless, I pitched the wort and brought the carboy into the house. One of my biggest goals with this brew (other than trying a new style) was to get some control on the fermentation temperature. Luckily, we tend to keep our house in the upper 60s. This brew calls for a fermentation temperature of 68-70 degrees. Perfect.
When I checked on the carboy the next morning, the activity was beyond anything I had seen before. The yeast was so active that several bubbles were coming out each second. The was yeast flying around the wort in quick swirls. I watched it for awhile, making sure I hadn’t added bacteria and create some terrible monster. But, it looked pretty good.

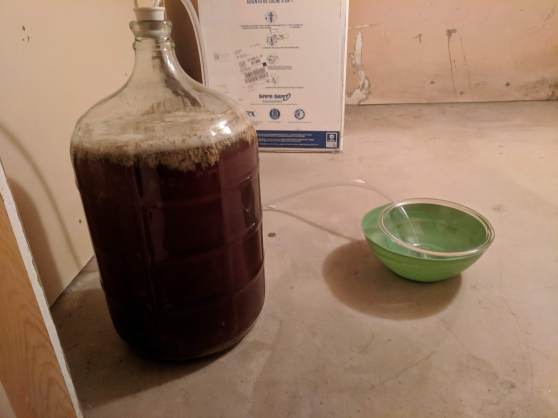
The intense fermenting subsided after just a day. I let the fermenting continue for four more days, until it mostly subsided. Then, as the recipe called for, I moved the beer into a secondary container (luckily I now have four carboys). This was a step I seem to have forgot about entirely the last time I brewed. This is the best method I know of dealing with yeasty bottles.

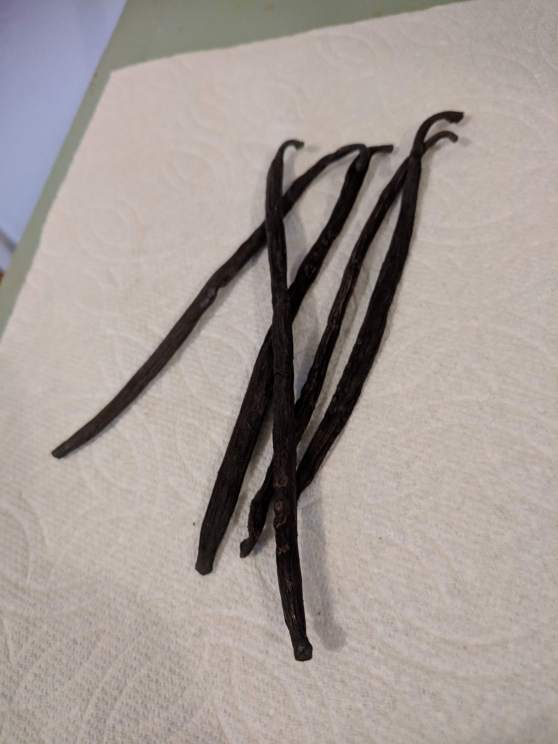
In the secondary container, I added five full vanilla beans. I had never seen full vanilla beans before. They have a really intense vanilla smell to them. I think they will add a good aroma as well as some extra vanilla taste. I let this sit at the same temperature in the house for another week. It should have only take a couple days but I work full time and have a newborn, so that is not really possible.
I left the secondary container alone for a week (again, longer than needed but work and baby make it hard to do work on the weekdays). I decided not to bottle directly from the secondary container since there was a little bit of sediment gathered on the bottom. I moved the beer to another carboy and added five ounces of priming sugar. This beer may be the clearest beer I have every brewed. It looks gorgeous. After completing the mixture, I bottled. I got 41 12-ounce bottles in all. 492 ounces. A little less than four gallons of beer after rejecting a lot of yeast. But worth forgoing a few beers for a better product.

The recipe calls for three weeks of bottle conditioning followed by one week in the fridge before consumption. I ended up waiting two weeks before deciding to test one out. After leaving one in the fridge for a day, i decided to try it out. I poured it into a pint glass. And…it has one of the best head’s I have ever made. I am pretty sure this is due to using priming sugar. I have often used different types of sugar–honey, grapefruit juice concentrated, etc. They add a nice flavor but seem to destroy the head. This is going to be something I will have to play around with. Like with this brew, it seems better to add late flavors into the secondary fermentor rather than in the priming solution.

The beer itself is beautiful. Pretty much what I expected since I used a clarifier, a secondary fermentor and moved it to a final carboy before bottling. I was surprised by how smooth the beer was. I don’t have the fullest vocabulary for test. Instead, I will just quote my wife, “I think this is the best beer you’ve made.” That sounds like a great start to the 100 Brew Challenge.

I will be putting the remaining brews in the fridge this weekend. However, judging from the fact that my wife loves these, I may have to make this one again later this summer. The next time I make this I want to make sure I use a thermometer. I also want to add vanilla extract during the secondary fermentor. I think that would make the taster even bolder. I also want to see if I can get more than 500 ounces out of it without sacrificing flavor or clarity. I am not sure how to accomplish that. But I do believe it will be worth it if I can get another six pack or two out of it.
As for my second brew, I already have the ingredients in my brewery. I will be making a Springtime Gose. With this one, I am continuing the goal of trying styles of beer I have never tried before. I will use a thermometer to make sure I am hitting the correct temperatures at the correct times. I will be using the liquid yeast properly this time–after reading the instructions in full. I also will start working on producing more than 500 ounces of beer.
Second Brew Day: Saturday, April 13th, 2019

Pingback: Brew Two: Springtime Gose – Richard T. Reilly